Are you looking to hold those tricky seams in place? You’re in the right place.
In this post, we’ll go over everything you need to know about the basting stitches. So you can finish your project with ease, knowing that your fabric won’t slip as you work.
Let’s get started.
What Is A Basting Stitch?
Basting stitches, also known as task stitches, are temporary stitches that hold two fabrics together. These stitches make it easy to hold a seam or trim the fabric.
It’s one of the best ways to see what your project could look like when finished. You can create a basting stitch using your hands or with your sewing machine.
Different Ways Of Creating Basting Stitch’s
You can create a basting stitch in one of two ways: by hand or using a machine.
By Hand
Basting by hand is slower and difficult at first. But after practice, basting stitches are simple and easy to perform. While you will never be faster than a sewing machine, it might be faster than having to set up your sewing machine.
Creating basting stitches by hand does offer some benefits. First, doing basting stitches by hand gives you more control. You can easily adjust how tight it is so that it’s easy to remove once you are ready.
Whenever you are using a basting stitch, use a different color thread than the original thread. This will make it easy when you are removing the thread later. You won’t have to worry about removing the wrong thread.
By Machine
You can also create basting stitches using a machine. Machines are quicker than doing it by hand. Using a machine is much easier if you have a large project that needs basting stitches.
Most newer sewing machines come with a basting stitch setting. This setting typically adjusts for the tightness and the length of the stitch.
If you don’t have a basting stitch setting on your sewing machine, you can manually create a basting stitch. You can do this by adjusting your stitch length to the longest setting. This is typically between 5mm and 7mm.
Similar to when creating basting stitches by hand, you should always use a different color thread for your basting stitch. This will make it easier to remove later.
When To Use A Basting Stitch?
There are many occasions when you can use a basting stich but the options below are the most fundamental. These options will help you get started using basting stitches as you sew.
Use The Basting Stitch To Hold Bulky Fabric
Basting stitches can be used to hold bulky fabric in place. For example, when you are making blankets or quilts. Thich fabric is hard to handle while you sew.
Basting stitches will allow you to hold these in place so you can focus on your sewing. You must use the right basting stitch for each situation.
Using the wrong basting stitch can cause slippage. If you’re creating basting stitches using a machine, this is typically not a problem since the stitches are made tight.
Use The Basting Stitch To Fit A Garment
If you’re still fitting a project or garment, you don’t want to make any permanent stitches until you’re done.
Basking stitches can allow you to do that. You can secure it in place without any permanent changes. This is a great way to get a feel for what your project looks like before you begin sewing.
Hold Multiple Layers Together
If you are sewing quilts or making a thick coat you will have multiple layers. Sewing multiple layers in place is challenging. The movement of the fabric and the penetration of the needle can cause them to become unaligned.
Using a basting stitch will allow you to hold the layers together as you sew. If you are doing this by hand you will typically need to use a tailor basting stitch. Other basting stitches are not as effective when done by hand.
Use The Basting Stitch To Make Ruffles
You cannot make ruffles without basting stitches. Whether you’re making the hemlines of your table centerpiece or your midi Mexican skirts, you have to do the ruffles neatly.
Pick a fabric that suits your needs, larger fabric means fuller ruffles. You can make a single edge gathering for bias cut fabrics like the one you see on your table cloths..
Types Of Basting Stitches
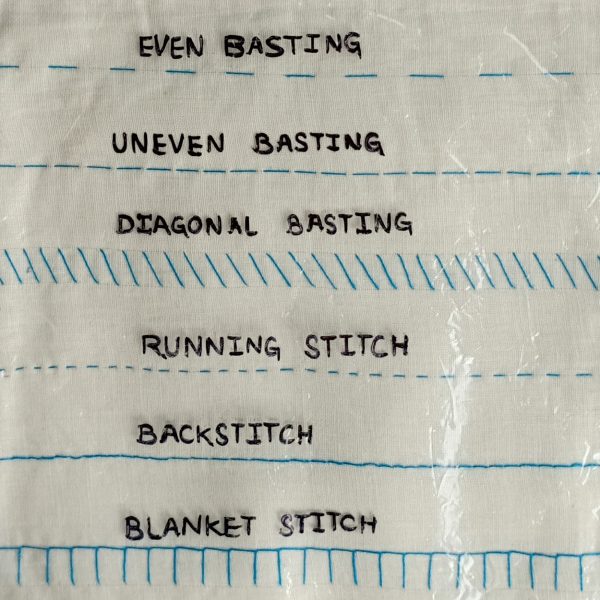
1. Uneven Basting Stitch
Use uneven basking to secure underlining to your garment. Uneven basking is also useful to mark style lines in your fabric. If you have style lines on your project, basting stitches help to highlight them.
It is also practical when you’re joining two clothes with less strain or only have a straight line. This stitch produces short stitches across the back of the fabric and long stitches in front of it.
How To Create Uneven Basting Stitches
Thread your needle but don’t secure it. Leave about two inches of tail thread. Insert the needle on the fabric’s underside. Leave about an inch of allowance, and pull out the needle. At about 1″, poke the needle back into the fabric.
Next, insert the needle back about 1/2 inches. Tug the thread. This will produce a shorter stitch on the other side. Continue stitching without pulling the yarn to the end. This way, you can save up some time. Proceed by moving about an inch further from the last stitch you made before creating the second set of stitches.
Obtain a quarter or half an inch before tugging the needle back up the fabric repeat this process till you cover all the areas you need to baste.
After finishing, leave another two inches of tail. You can pull this tail when you already make the permanent stitches and remove the basting. You don’t want to lock the thread on your item because the purpose of basting is for you to remove it quickly.
2. Even Basting Stitch
The Even Bastin Stitch is the standard basting stitch. This basting stitch is very similar to a regular running stitch.
If you are not sure what a running stitch is, it’s the basic stitch that most people know how to do. The technique requires you to put the stitch in through one side and out through the other side at an equal distance.
The only difference between an even bating stitch and a running stitch is that the stitches are longer.
How To Create An Even Basting Stitch
If you have ever sewing anything by hand or know how to create a running stitch, then the even basting stitch will be easy.
The steps are simple.
Pro Tip: The seams on either side of the fabric need to be evenly spaced. If they are not evenly placed, your fabrics won’t be held together properly.
3. Tailor Basting Stitch
The tailor basting stitch is used to hold together the different layers of a larger fabric, such as a coat. For example, a coat might have three distinct layers: the fabric, interfacing, and padding.
The tailor basting stitch will help you keep each layer in place as you sew them all together.
How To Create A Tailor basting stitch
Here are the steps to making successful tailor stitches.
4. Slip Basting
The magic of perfectly even stripe shirts or dresses is a right slip basting stitch. It’s an invisible seam that controls and joins different fabrics together.
This is one of the more advanced types of basting stitches. It requires precision and patience to execute.
How To Create A slip Basting Stitch
Creating a slip basting harder than any other basting stitch. But with these steps and videos, you should be able to create a slip basting stitch with ease.
Here are the steps:
The end results should look seamless and hold the fabric together.
Best Thread For Basting Stitches
Basting Thread
Basting thread is specially designed for basting stitched. This tread is designed to be flimsy, and easy to remove. Thus, the thread is not made for other uses. If used for anything other than a basting stitch, it will likely rip or tear over time. Basting threads are available in the market at a low price.
Cotton Thread
Cotton Thread is a great alternative if you don’t have access to basting thread.
I recommend you use a 50-weight thread. This thread is typically durable enough to hold the fabric in place but it’s still easy to remove.
Using thread that is thinner than 50-weight may be too weak and it may tear before you are done.
Water-Soluble Thread
As the name suggest, water-soluble thread will dissolve when exposed to water or other liquids.
This is a great option because you don’t have to worry about removing it by hand.
Water soluble thread is only an option if you will be washing the fabric before you are using it. If you will not be washing it then you should not use this thread.
How To Remove The Basting Stitches?
Never rush this process. You would want to create a clean finish to your fabric.
Start by loosening the threads with a seam ripper.
Seam rippers will make it easier and faster to pull the thread out. Once you are ready you can cut the thread. Once the thread is cut you can remove the thread from each side.
Basting Stitch Alternatives
Basting is the easiest and quickest way to control your fabric but let me share some more tricks that’s also effective with this job.
Pin Basting
Nothing beats a traditional pin. While these may not be effective when you’re sewing with a machine, this can work when you’re hand sewing.
It’s one of the most basic techniques; pin two fabrics together, either horizontal or vertical, before starting sewing.
If you prefer to do this method even when you’re using a machine, be sure to remove each pin before running a stitch because it may break your machine’s needle.
Using Tape
Another way to hold the fabric together is to iron a double-sided tape like a Wonder Tape. These types live up to the wonder in its name because you can finally say goodbye to needle piercings.
It’s perfect when you’re working on the most delicate fabrics and also those that should not have holes in them like leather fabrics.
Using Wonder Clips
Wonder clips are another great alternative to basting stitches.
They are inexpensive and can hold bulky fabric with ease. Since they come in different sizes you can also adjust according to your needs.
The downside is that they can get in the way when you are sewing. Another thing is that they can be ineffective when they are not on the edge of the fabric.
Using a Basting spray or glue
There’s also glue for our fabrics. It will also come in handy to unite your materials briefly.
Just stick with the directions. Different brands may be particular with temperature and will go off if it doesn’t apply to your working area
Conclusion
Every job that’s made easier by machines were once accomplished by human hands, so anything made with yours can be a true masterpiece.
Now that you understand why it’s important not to be hasty and take shortcuts, you also understand why basting stitch can be your life lines so make it a habit before starting with anything else.
It should become almost like a muscle memory to start sewing with a basting stitch. It’s a lifesaving technique. Start sewing and soon you’re rocking on with your ruffle off shoulder dresses.


